Overview
Action buttons allow you to perform different functions relevant to processing a return request.
Depending on your subscription plan, some actions may be available or not, and may be performed manually or automatically.
In this article, we will be covering action buttons that have an actual effect on your return flow, rather than those that simply redirects you to a different page.
Approve Return
Approval is the first stage in the RMA’s lifecycle, which allows you to review the return request details and decide whether to accept or reject it.
The Pending Request status indicates that the request is pending for your approval.
The APPROVE RETURN button allows you to:
- Send the approval email to the customer
- Write additional information or instructions concerning the approval
- Attach relevant documents
- Toggle the return method to be applied to the RMA.
Consequently, the return shipping instructions in the approval email.
Approval triggers a set of events relevant to the return request:
- The RMA status changes from Pending Request to Approved Request.
- The approval email is sent to both you and the customer (assuming your email settings are configured accordingly).
- ReturnGO will post updates in the order’s notes and timeline.
- If a ship with pre-paid label return method was used, a request for a label will be sent to your linked shipping provider, and will automatically include a PRINT LABEL option in the approval email.
- If any return method was used other than no shipment required, the APPROVE RETURN button will change to SHIPMENT RECEIVED.
Otherwise, it will change to MARK AS DONE. - If variant exchange was selected for at least one item in the return request, ReturnGO will automatically create a draft order in your Shopify store.
Consequently, a new action button, RELEASE EXCHANGE, will be available in the RMA card.
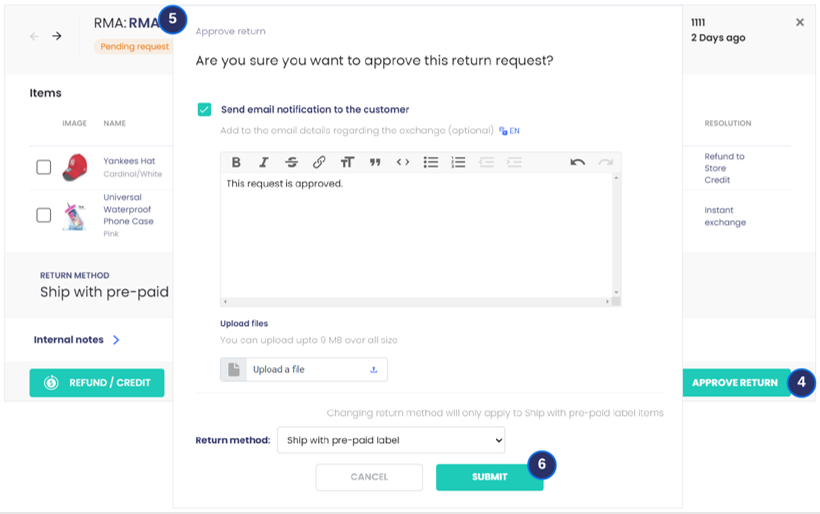
To approve a return request:
- Go to Manage Returns
- Search for the request, typically using the RMA number or Shopify order ID, or use the Pending Request filter to shorten the list
- Click any information on the relevant RMA line, typically, the RMA number or click the VIEW action button at the right-most area of the RMA line
- On the RMA card, click APPROVE REQUEST
- On the Approve Return dialog box, you can:
- Set whether to send an email notification to the customer
- Write personal notes or additional instructions
- Upload relevant documents
NOTE : In case you generate labels outside ReturnGO, you can attach the return label through here - Manually toggle the return method to something else, if ever the default return method does not apply
- Click SUBMIT
FAQs about Approve Request
Are there any requirements/limitations to make this action?
None.
Although if the label request sent to your linked shipping platform fails, then the approval attempt would also fail.
What type of action is this?
RMA-level.
The Approved Request status is applied to the entire RMA.
Can this stage be automated?
Yes.
You can enable auto-approval on each policy rule through Settings > Return Policy.
Is this action reversible?
No.
If an RMA was approved by mistake, you can go back to the RMA card and reject it, then resubmit the request to reverse the action.
Additionally, the email notification triggered can no longer be recalled.
Can this be used on multi-item/multiple item returns?
Yes, since this is an RMA-level action.
If there is at least one item that you want to reject, then you will need to reject the entire RMA then either ask the customer to resubmit a return request or you can resubmit the return request on their behalf.
If there is at least one return policy that is configured for manual approval, selected by the customer when submitting the request, the RMA will be subject to manual approval.
Reject
You can configure your return policies to automatically filter and block return requests that do not meet your exchange and return policy requirements.
In case a return request comes through but is no longer eligible, you can manually reject such requests.
You can reject requests at any point during the returns process, as long as the RMA has not been marked as Done.
The REJECT button allows you to:
- Send the rejection email to the customer
- Write additional information or instructions concerning the rejection
- Attach relevant documents
Rejecting the RMA triggers the following events:
- The RMA status changes from its current status to Request Rejected, effectively terminating the return flow.
- The rejection email is sent to both you and the customer (assuming your email settings are configured accordingly)
- ReturnGO will post updates in the order’s notes and timeline.
- Both the APPROVE REQUEST and REJECT buttons will be hidden from view. No additional action buttons will appear.
- REFUND/CREDIT, RESTOCK, and RESEND STATUS EMAIL buttons will still be available.
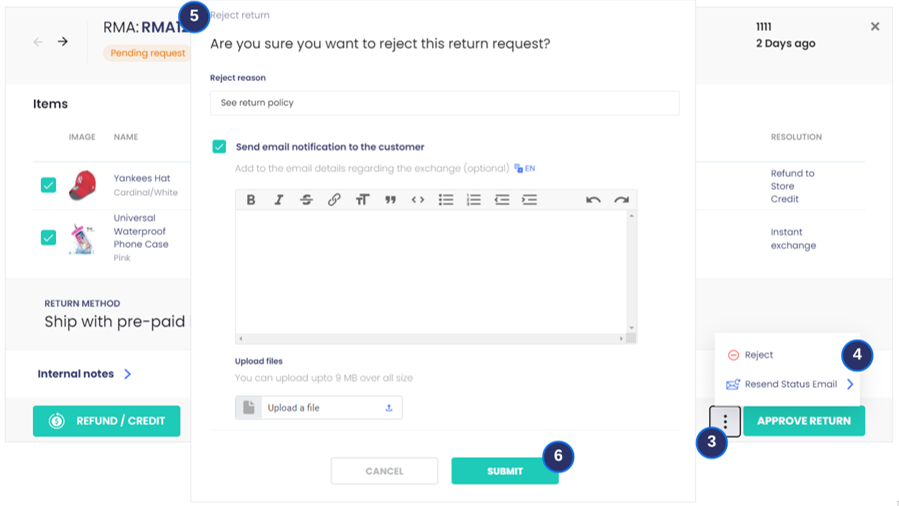
To reject a return request:
- Go to Manage Returns
- Search for the request, typically using the RMA number or Shopify order ID, or use the Pending Request filter to shorten the list
- Click any information on the relevant RMA line, typically, the RMA number or click the VIEW action button at the right-most area of the RMA line
- On the RMA card, click the 3-dot menu to show more options
- Click REJECT
- On the Reject Return dialog box, you can:
- Provide a short reason for the rejection
- Set whether to send an email notification to the customer
- Write personal notes or additional instructions
- Upload relevant documents if any
NOTE : In case you generate labels outside ReturnGO, you can attach the return label through here - Click SUBMIT
FAQs about Rejecting a Request
Are there any requirements/limitations to make this action?
None.
Although RMAs that are already marked as Done can no longer be rejected.
What type of action is this?
RMA-level.
The Request Rejected status is applied to the entire RMA.
Can this stage be automated?
No.
We currently do not have an auto-reject feature.
Is this action reversible?
No.
If an RMA was rejected by mistake, it can no longer be reversed.
Either ask the customer to resubmit a return request or you can resubmit the return request on their behalf.
Additionally, the email notification triggered can no longer be recalled.
Can this be used on multi-item/multiple item returns?
Yes, since this is an RMA-level action.
If there is at least one item that you want to reject, then you will need to reject the entire RMA then either ask the customer to resubmit a return request or you can resubmit the return request on their behalf.
If there is at least one return policy that is configured for manual approval, selected by the customer when submitting the request, the RMA will be subject to manual approval.
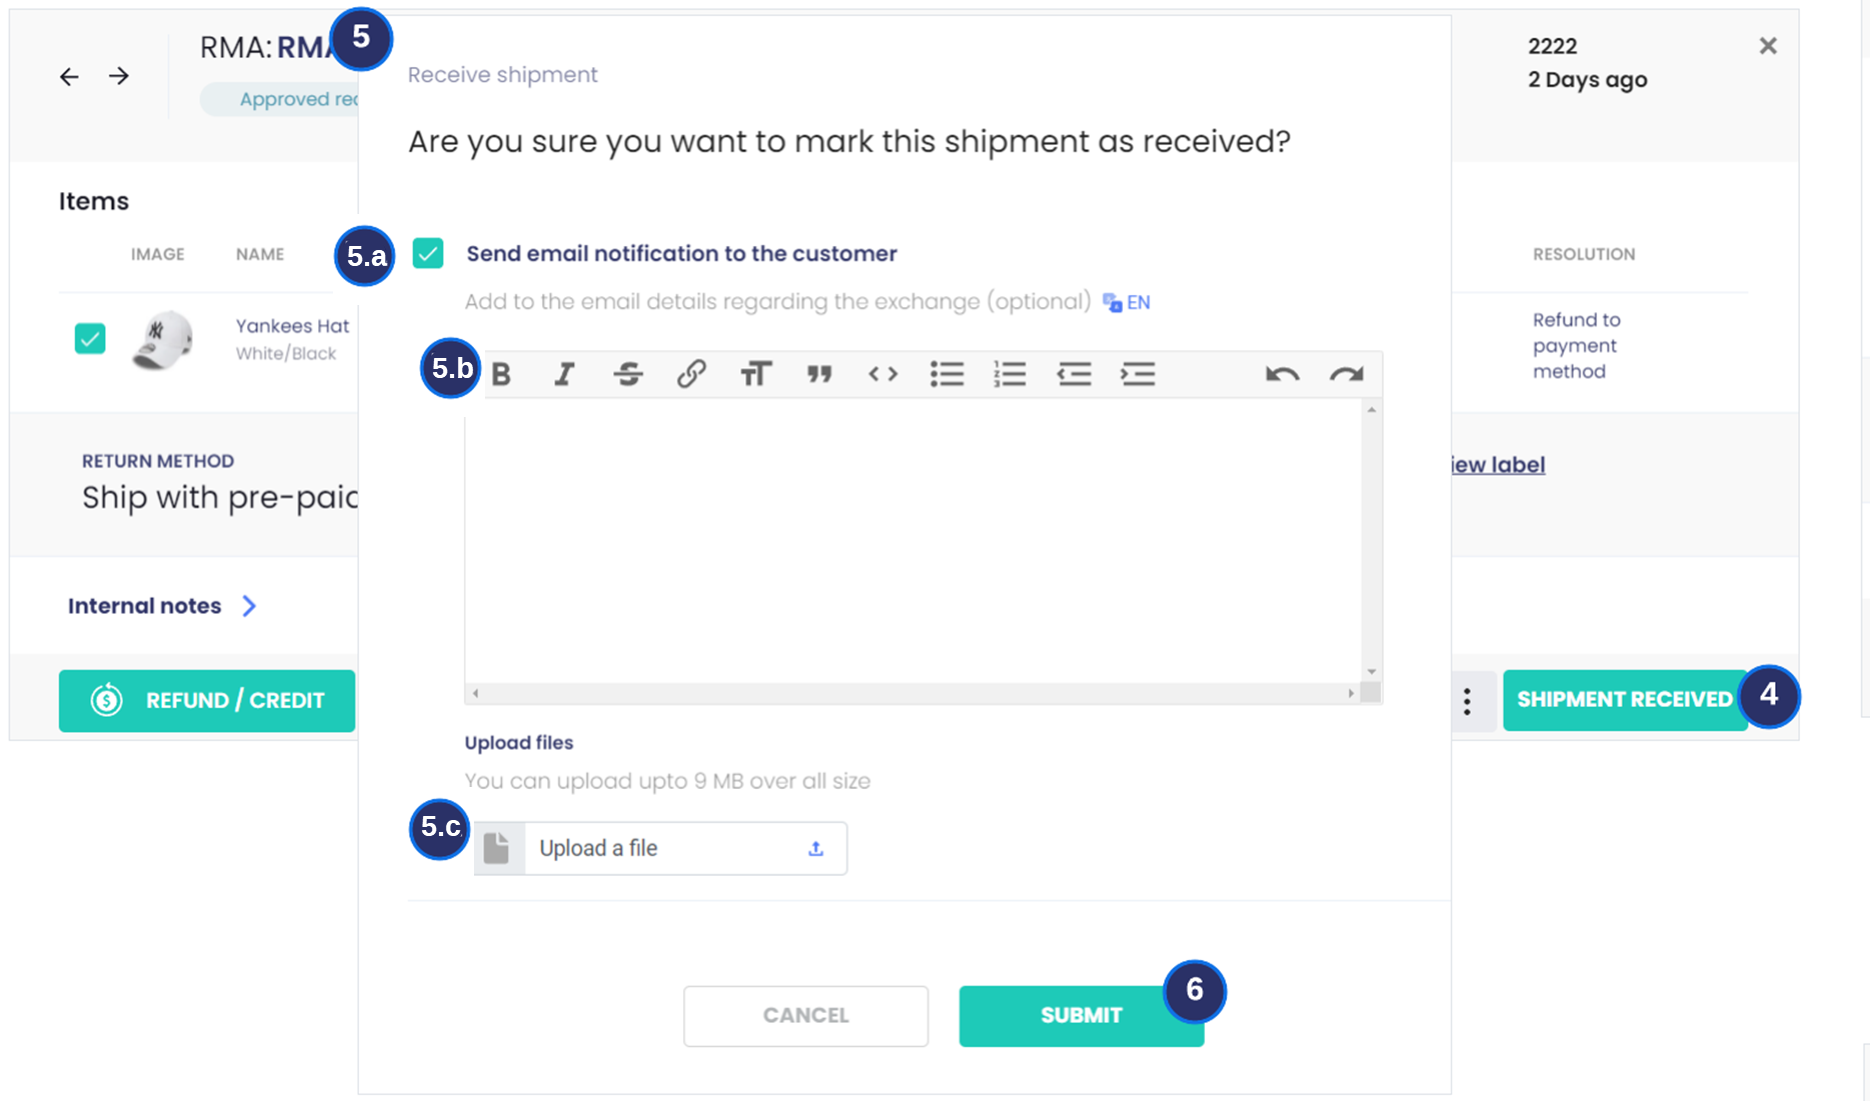
Shipment Received
The SHIPMENT RECEIVED button allows you to acknowledge the receipt of returned items with your customer, while marking the RMA as Shipment Received.
Typically, you can use this as your cue to process the requested resolution; whether to issue a refund or release an exchange order.
The SHIPMENT RECEIVED button replaces the APPROVE RETURN button, and will only be available if the RMA was approved with one of this return methods:
- Ship with prepaid label
- Ship with any carrier
- Return to store location
Marking an RMA as Shipment Received triggers the following events:
- The RMA status changes from Approved Request to Shipment Received.
- The shipment receipt email is sent to both you and the customer (assuming your email settings are configured accordingly)
- ReturnGO will post updates in the order’s notes and timeline.
- The SHIPMENT RECEIVED button changes to the MARK AS DONE button.
- If you have the item validation feature enabled, the VALIDATE ITEMS button will appear.
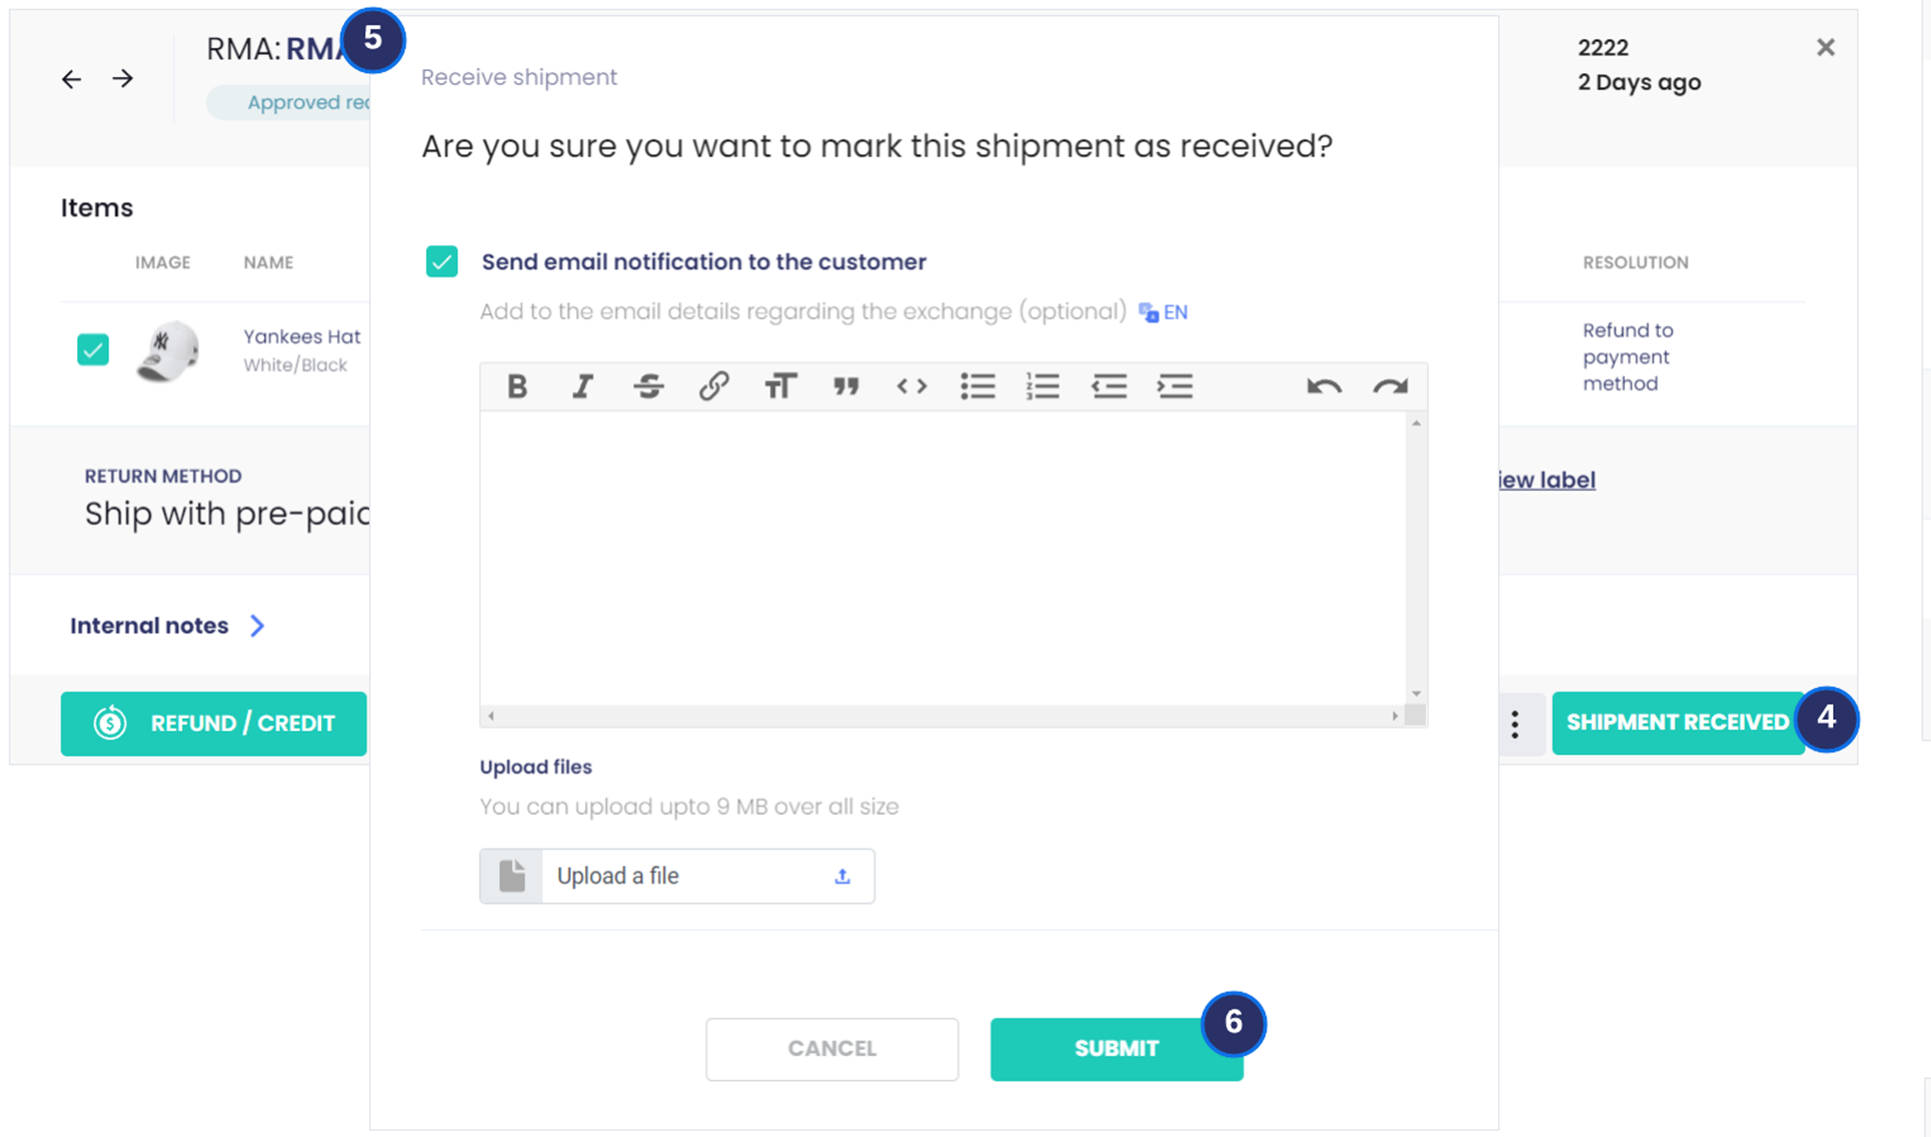
To mark an RMA as Shipment Received:
- Go to Manage Returns
- Search for the request, typically using the RMA number or Shopify order ID, or use the Approved Request filter to shorten the list
- Click any information on the relevant RMA line, typically, the RMA number or click the VIEW action button at the right-most area of the RMA line
- On the RMA card, click SHIPMENT RECEIVED
- On the Receive Shipment dialog box, you can:
- Set whether to send an email notification to the customer
- Write personal notes or additional instructions
- Upload relevant documents if any
NOTE : In case you generate labels outside ReturnGO, you can attach the return label through here - Click SUBMIT
FAQs about Shipment Received
Are there any requirements/limitations to make this action?
Yes.
Shipment Received status does not apply to no shipment required return method, since no item is expected to be shipped back.
Consequently, this status does not apply to Keep the Item and Donate the Item, as both are naturally paired with no shipment required.
Additionally, Shipment Received status does not apply to rejected requests.
What type of action is this?
RMA-level.
The Shipment Received status is applied to the entire RMA.
Can this stage be automated?
No.
We currently do not have an auto-shipment received feature.
Is this action reversible?
No.
If an RMA was marked as Shipment Received by mistake, it can no longer be reversed.
Additionally, the email notification triggered can no longer be recalled.
Can this be used on multi-item/multiple item returns?
Yes, since this is an RMA-level action.
Release Exchange
If Variant Exchange was selected for at least one item in the return request, ReturnGO will automatically create a $0 draft order in your Shopify store once the request is approved. At the same time, a new action button, RELEASE EXCHANGE, will be available in the RMA card.
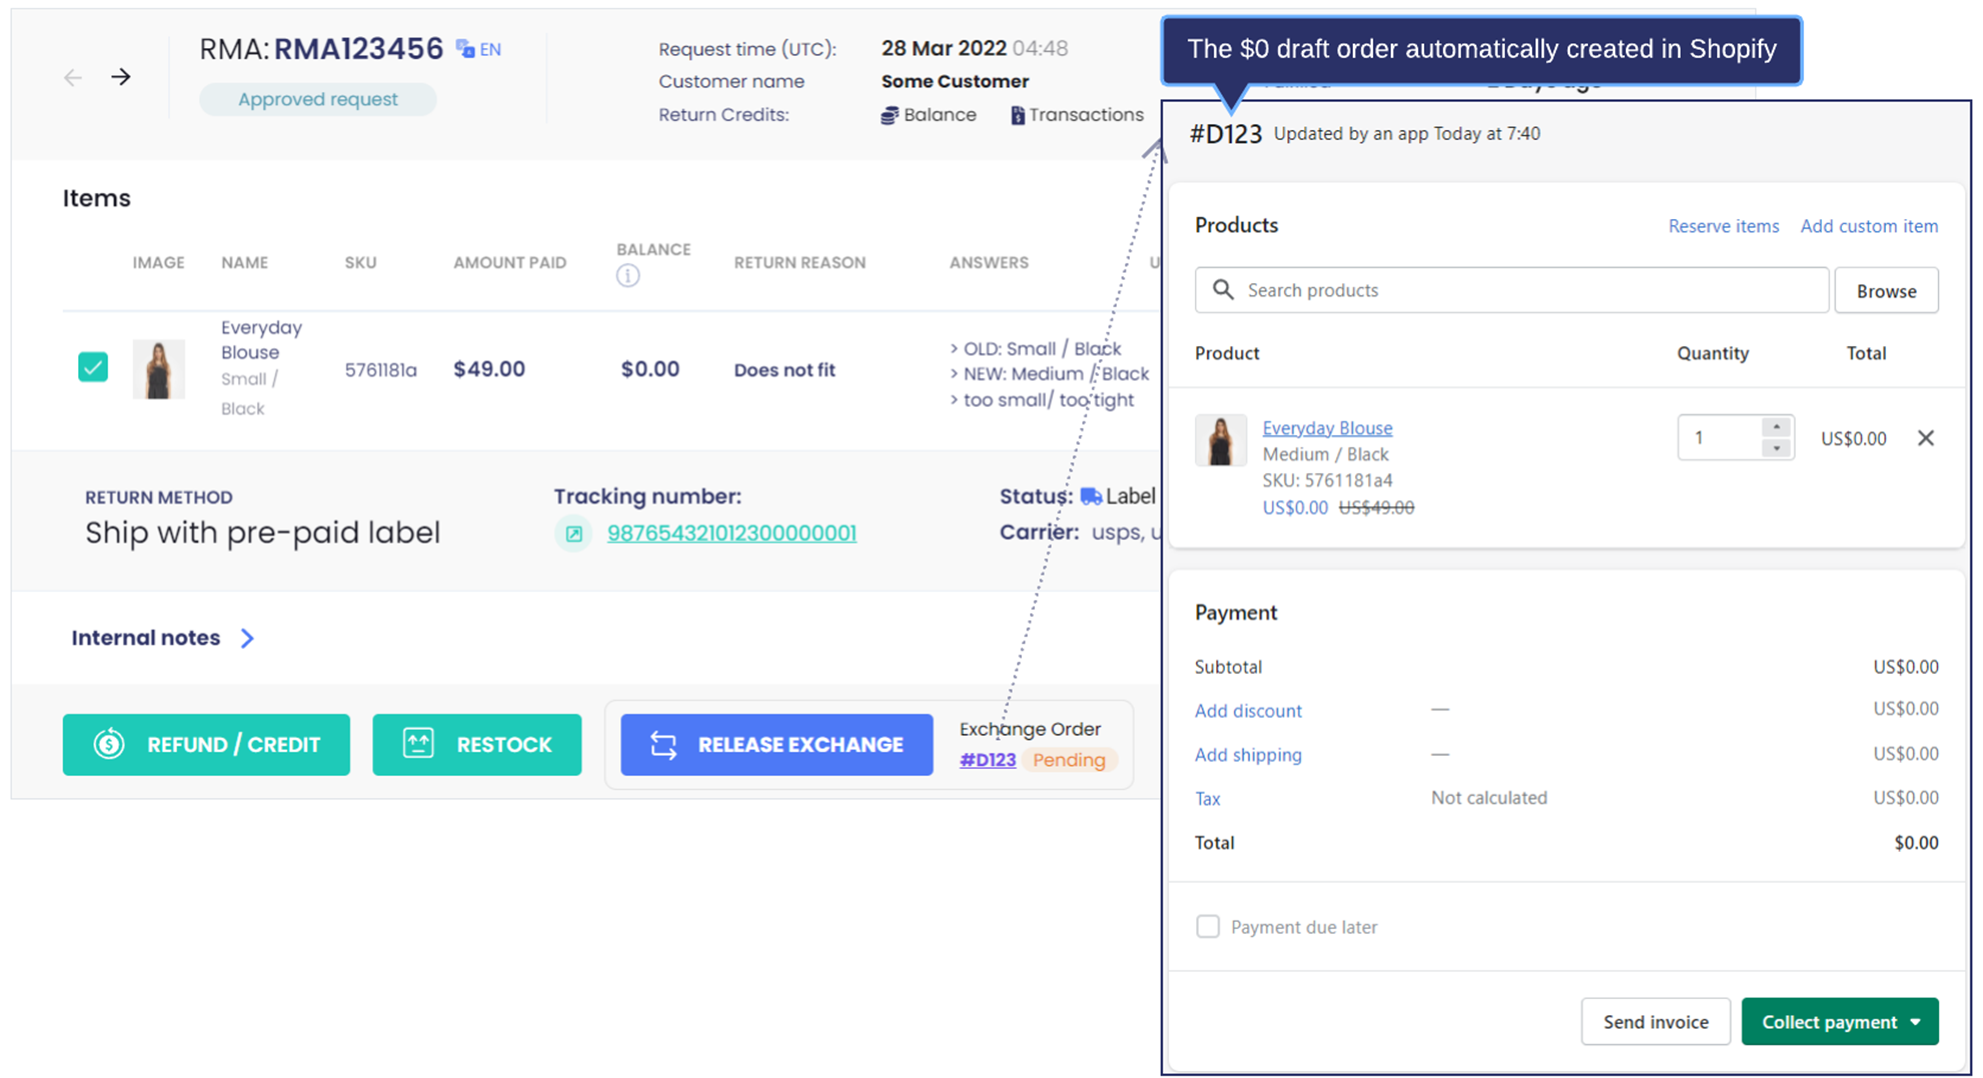
The RELEASE EXCHANGE button allows you to move the draft order to an actual unfulfilled order in Shopify, which you can then process as you would any order.
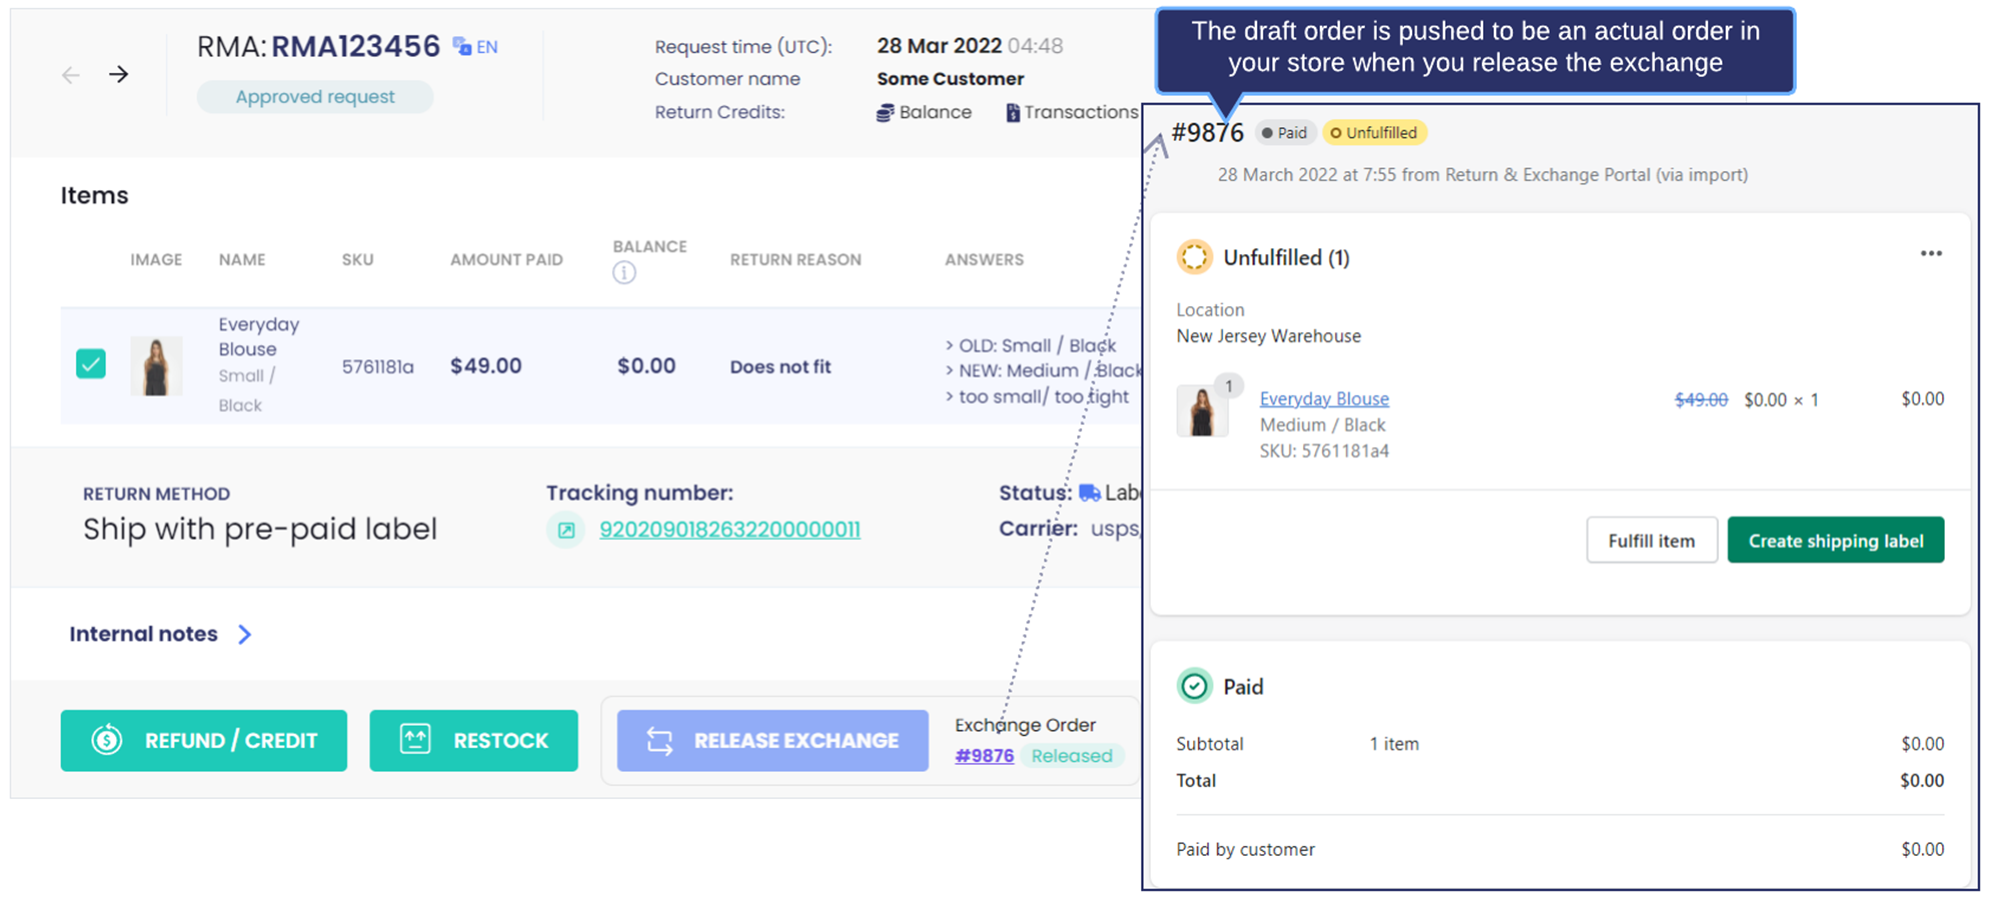
You can release the exchange at any point during the returns process, although typically, the exchange is released upon receiving the returned item.
Releasing an exchange triggers the following events:
- The draft order is moved to be an actual unfulfilled order in Shopify.
- The Exchange Order status in the RMA card will change from Pending status to Released status.
- The RELEASE EXCHANGE button will be grayed out and becomes unclickable.
- The new order email notification from Shopify is sent to the customer.
- ReturnGO will post updates in both original and exchange orders’ notes and timeline.
- The number of selected exchange items will be taken off your inventory in Shopify.
To release an exchange request:
- Go to Manage Returns
- Search for the request, typically using the RMA number or Shopify order ID.
- Click any information on the relevant RMA line, typically, the RMA number or click the VIEW action button at the right-most area of the RMA line
On the RMA card, click RELEASE EXCHANGE
FAQs about Release Exchange
Are there any requirements/limitations to make this action?
Yes.
The RELEASE EXCHANGE button will only be available if there is at least one item submitted for instant exchange.
What type of action is this?
Item-level.
The RELEASE EXCHANGE button will only affect the items submitted for instant exchange.
Can this stage be automated?
Yes.
We currently offer the auto-exchange feature in our Pro plan.
You can enable auto-exchange via Settings > Return Policy, then go to your variant exchange policy.
The auto-exchange feature currently uses one of these statuses as trigger, with a configurable delay (in days):
- RMA is approved
- Shipment is in-transit
- Shipment has been received
The exchange order includes everything the customer requested to exchange in the RMA. If any item included is set for manual release, then all items will be manually released.
The exchange order includes everything the customer requested to exchange in the RMA. If any item included is set for manual release, then all items will be manually released.
Is this action reversible?
No.
Once the exchange has been released, the draft order will be moved to be an actual order in Shopify.
Can this be used on multi-item/multiple item returns?
Yes, but only to items submitted for instant exchange.
Does the draft order reserve the stock for the exchange item?
No, this is a Shopify limitation.
Although there is a RESERVE ITEMS function in the draft order, reserving items using it will not deduct the item count from the inventory.
Refund/Credit
The REFUND/CREDIT button allows you to send payment back to your customer in the form of a refund, store credit, gift card, or refund to bank account.
READ MORE : REFUND
Marking an RMA as Shipment Received triggers the following events:
- The RMA status changes from Approved Request to Shipment Received.
- The shipment receipt email is sent to both you and the customer (assuming your email settings are configured accordingly)
- ReturnGO will post updates in the order’s notes and timeline.
- The SHIPMENT RECEIVED button changes to the MARK AS DONE button.
- If you have the item validation feature enabled, the VALIDATE ITEMS button will appear.
To mark an RMA as Shipment Received:
- Go to Manage Returns
- Search for the request, typically using the RMA number or Shopify order ID, or use the Approved Request filter to shorten the list
- Click any information on the relevant RMA line, typically, the RMA number or click the VIEW action button at the right-most area of the RMA line
- On the RMA card, click SHIPMENT RECEIVED
- On the Receive Shipment dialog box, you can:
- Set whether to send an email notification to the customer
- Write personal notes or additional instructions
- Upload relevant documents if any
NOTE : In case you generate labels outside ReturnGO, you can attach the return label through here
- Click SUBMIT